How to Measure a Back Saw: Blade Length, Depth, TPI & More
To learn how to measure a back saw correctly, measure the blade length along the tooth line from the heel near the handle to the toe, then measure the usable blade depth from the tooth tips to the bottom of the rigid back. You can also measure the saw’s overall length, plate thickness, tooth count, and kerf when you need a complete specification.
The biggest source of confusion is that a backsaw has several dimensions that may all be described casually as its “size.” A manufacturer might call a tool a 12-inch backsaw because its toothed blade is approximately 12 inches long, even though the entire saw including the handle is considerably longer. Likewise, blade depth is not the same measurement as blade length.
Understanding these dimensions becomes especially useful when identifying an older saw, ordering a replacement, comparing dovetail, carcass, sash, and tenon saws, choosing the right saw for a joint, or checking whether a saw has enough depth to complete a particular cut.
Tooth measurements introduce another distinction. TPI means teeth per inch, while PPI means points per inch. These numbers are closely related but technically are not always identical, so knowing which system is being used can prevent confusion when comparing vintage and modern saws.
In this guide, I’ll explain how to measure a back saw from heel to toe, determine cutting depth, measure overall dimensions and blade thickness, calculate TPI or PPI, check kerf width, and interpret those numbers when comparing different types of backsaws.
What Measurements Define the Size of a Back Saw?
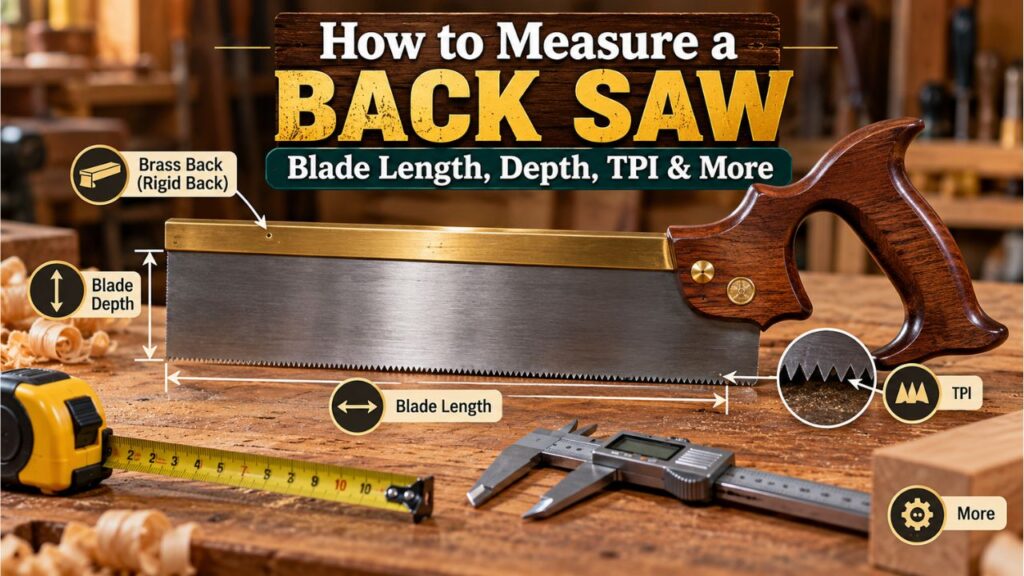
A backsaw is identified by more than one measurement.
The most useful specifications are usually:
- Blade length
- Usable cutting depth
- Overall saw length
- Blade or saw-plate thickness
- TPI or PPI
- Kerf width
You will not need every measurement every time.
If someone asks, “What size is that backsaw?” they are most likely asking about blade length, such as 10 inches, 12 inches, 14 inches, or 16 inches.
If you need to know whether the saw can cut a deep tenon, blade length tells only part of the story. You also need to know the usable depth below the spine.
For sharpening, identifying a vintage saw, or selecting a saw for different stock thicknesses, the tooth count becomes important.
Back Saw Anatomy You Need to Know Before Measuring
A few terms make measurement much easier.
The toe is the front end of the blade, farthest from the handle.
The heel is the rear portion of the cutting edge near the handle.
The tooth line is the cutting edge containing all the teeth.
The saw plate is the thin steel blade.
The back or spine is the stiffened strip running along the upper edge of the plate. Traditional saws often use folded or slotted brass or steel backs, while modern designs may use other rigid materials.
The handle is normally attached near the heel.
Once you can identify these parts, nearly every measurement becomes straightforward.
Key Takeaways:
- Back saw “size” usually refers to blade length, not the entire tool.
- Blade length is measured along the tooth line from heel to toe.
- Cutting depth is measured vertically from the tooth line to the lower edge of the rigid back.
How to Measure a Back Saw Blade Length
Blade length is the main measurement used to describe many backsaws.
Place the saw on a flat surface with the toothed edge visible.
Position a ruler or tape measure along the tooth line.
Measure from the heel of the usable toothed blade near the handle to the toe at the front of the blade.
Keep the measuring tool parallel to the tooth line rather than following the upper back or measuring diagonally across the plate.
If the saw measures approximately 12 inches along the cutting edge, it would ordinarily be described as a 12-inch backsaw.
Do You Include the Handle?
No, not when determining the nominal blade length.
The handle is included only when measuring the overall length of the complete saw.
For example, a saw may have a 14-inch usable blade while measuring around 19 inches or more from the front of the blade to the end of the handle.
Those are two valid dimensions describing different things.
Do You Measure the Brass or Steel Back?
Not for normal blade-length measurement.
The back may extend slightly differently from the toothed section of the plate. What matters when describing blade length is usually the usable cutting edge.
Measuring along the tooth line provides the most meaningful comparison between saws.
What if the Blade Is Tapered or Skewed?
Some backsaws have blades whose depth changes from heel to toe.
That does not significantly alter how you measure blade length.
Follow the tooth line from heel to toe.
The changing depth matters when measuring cutting capacity, which should be recorded separately.
How to Measure the Cutting Depth of a Back Saw
Blade depth is particularly important with backsaws because the rigid spine prevents the saw from cutting indefinitely into the workpiece.
Take a ruler and measure perpendicular to the tooth line.
Start at the tips of the teeth and measure upward to the lowest edge of the rigid back.
This dimension represents the approximate maximum physical depth available before the back contacts the workpiece.
Manufacturers may call this:
Cut depth, blade depth, depth under the back, or usable blade depth.
For example, a saw might have a 14-inch blade but only about 2 1/4 inches of usable depth.
Another saw with the same 14-inch blade length could have a deeper plate and provide significantly greater cutting capacity.
Why Cutting Depth Matters
Imagine cutting the cheek of a tenon that extends 2 1/2 inches into a large piece of furniture stock.
A backsaw offering only 2 inches of usable depth cannot complete that cut normally because the spine will hit the top of the workpiece before the teeth reach your baseline.
This is why someone choosing a tenon saw should pay as much attention to cutting depth as blade length.
For dovetails and small joinery, limited depth is rarely a problem.
For large tenons, doors, workbenches, and heavy furniture joinery, it can determine whether the saw is usable at all.
Allow Some Extra Capacity
Do not choose a saw whose listed depth exactly matches the deepest cut you expect to make.
Some clearance is helpful.
If you commonly need 2-inch-deep cuts, a saw offering more than 2 inches under the back provides a more comfortable margin.
Blade Length vs. Overall Length
These measurements are frequently confused in product listings and discussions.
Blade length measures the cutting portion of the saw.
Overall length measures the complete tool from one extreme end to the other.
To measure overall length, lay the saw flat and measure from the forward-most point of the toe to the farthest end of the handle.
A backsaw with an 11-inch blade, for example, might have an overall length of roughly 16 inches or more depending on the handle design.
Overall length matters for:
- Storage
- Toolboxes
- Saw tills
- Shipping
- Comparing how compact different saws are
But it is not usually the primary number used to describe the saw’s cutting capacity.
How to Measure the Overall Height of a Back Saw
Overall height can also be useful, especially when identifying a vintage tool or making a fitted storage case.
Stand or lay the saw in its normal orientation.
Measure from the lowest part of the tooth line to the highest point of the spine or handle, depending on whether you want the blade assembly height or the complete tool height.
Make sure you describe which measurement you recorded.
For woodworking performance, the most useful vertical measurement is normally usable depth below the back, not maximum overall height.
Key Takeaways:
- Blade length and overall length are separate specifications.
- Overall length includes the handle; nominal saw length normally does not.
- When evaluating joinery capacity, usable depth below the back is more useful than total saw height.
How to Measure TPI on a Back Saw
TPI stands for teeth per inch.
To measure it, place a ruler directly against the tooth line.
Choose a clear 1-inch section and count the number of complete teeth within that distance.
Fine joinery backsaws can have many small teeth, so good lighting or magnification can make counting easier.
If the teeth are extremely fine, another method is to measure across two inches and divide the tooth count by two.
For example, if you count 28 teeth across two inches:
28 ÷ 2 = 14 TPI
This longer measurement can reduce counting error.
TPI vs. PPI: Are They the Same?
Not exactly.
PPI means points per inch.
Because neighboring teeth share points, traditional saw terminology can produce a one-count difference between TPI and PPI depending on exactly how the measurement is taken.
This is why some vintage hand saw references describe saws by “points” rather than simply teeth.
For ordinary woodworking, people often use TPI casually, and many manufacturers clearly state which system they use.
When comparing two saws, check whether both specifications are using TPI or PPI.
The Most Accurate Way to Count Points
Place the zero mark of your ruler directly on one tooth point.
Count the tooth points to the 1-inch mark.
If both ends of the measured inch fall exactly on points, the number of spaces between them represents the tooth frequency differently from simply counting every visible point.
For a practical buyer, the easiest approach is to use the manufacturer’s stated tooth specification whenever available.
Manual measurement is most useful for unidentified or vintage saws.
Why TPI Matters
Tooth count influences how aggressively and smoothly a backsaw cuts.
A lower tooth count generally means larger teeth and faster cutting in thicker stock.
A higher count means smaller teeth and typically produces a smoother, more controlled cut in thin material.
This is one reason dovetail saws often have relatively fine teeth while larger tenon saws frequently use coarser teeth.
Too many teeth in thick stock can make a saw cut slowly and clear sawdust poorly.
Too few teeth in thin stock can make the saw difficult to start and can produce a rougher cut.
The ideal tooth count therefore depends on what the saw is designed to do.
How to Tell Whether a Back Saw Is Rip or Crosscut
Blade length and TPI do not tell you everything about a backsaw.
You should also identify the tooth filing.
A rip-filed saw has teeth shaped primarily for cutting generally along the grain. The teeth act somewhat like tiny chisels.
A crosscut saw has tooth geometry designed to sever wood fibers when cutting across the grain.
This distinction matters because two 12-inch saws with similar TPI can perform very differently if one is filed rip and the other crosscut.
Common Uses
A dovetail saw is commonly rip filed because dovetail cuts generally travel with the grain on the ends of boards.
A tenon saw intended primarily for cheek cuts is also commonly rip filed.
A carcass saw used for cutting shoulders, dados, and components across the grain is often crosscut filed.
There are exceptions and hybrid tooth configurations, so identify the actual tooth geometry rather than assuming from the saw’s size alone.
How to Measure the Thickness of a Back Saw Blade
Saw-plate thickness is much smaller than the other dimensions, so a standard ruler is generally not precise enough.
Use a micrometer or good digital caliper.
Choose a clean, flat section of the plate away from the teeth and spine.
Close the measuring jaws gently against the blade.
Do not squeeze hard enough to flex the thin plate.
Modern fine backsaws may have saw plates around only a few hundredths of an inch thick. For example, a fine carcass saw can use approximately 0.020-inch steel.
The exact figure varies according to the saw’s size and intended function.
Why Blade Thickness Matters
A thinner plate removes less material and can make a fine saw feel very precise.
But an extremely thin blade depends heavily on the rigid back to prevent buckling.
Larger tenon saws may use somewhat thicker plates because they make longer and more demanding cuts.
Plate thickness also interacts with tooth set to determine the width of the kerf.
How to Measure the Kerf of a Back Saw
The kerf is the slot removed by the saw teeth as they pass through the wood.
Kerf is generally slightly wider than the plate because the teeth are set alternately to the sides.
This clearance prevents the main blade from binding in the cut.
Trying to measure individual tooth set directly can be difficult without specialized measuring equipment.
For a practical kerf measurement, make a straight test cut in a stable piece of scrap wood.
Then measure the resulting slot with an appropriate feeler gauge or other precise method.
Another option is to measure a known-width workpiece before and after cutting and account carefully for the material removed, although this is less convenient.
Plate Thickness Is Not Kerf Width
Suppose your saw plate is 0.020 inch thick.
That does not necessarily mean the kerf is exactly 0.020 inch.
If the teeth are set outward by a small amount on each side, the actual cut will be wider.
High-quality joinery saws often use very little set so the kerf remains narrow and the saw tracks accurately.
Too much set creates a wider, rougher kerf and may make precise joinery more difficult.
Too little set can cause the blade to bind.
How to Measure Tooth Set
For most home woodworkers, directly measuring tooth set is not necessary.
If you need to evaluate it during sharpening or restoration, specialized dial indicators, micrometers, or saw-setting gauges can provide more accurate measurements than an ordinary caliper.
The set is extremely small on many fine backsaws.
A practical test is often more useful.
Make a cut in straight-grained scrap.
The saw should move smoothly without binding, yet the blade should not feel loose or sloppy inside the kerf.
If the saw consistently pulls to one side, uneven tooth set can be one possible cause.
Measuring Different Types of Back Saws
The measurement method is basically the same regardless of backsaw style.
What changes is which dimensions matter most.
Dovetail Saw
A dovetail saw typically has a relatively short blade and shallow cutting depth.
Measure blade length along the tooth line, then check the usable depth.
Fine TPI or PPI is especially relevant because dovetail saws are intended for precise joinery in relatively thin stock.
Carcass Saw
Carcass saws sit in the middle of the backsaw family.
They generally have longer blades and more depth than small dovetail saws but remain maneuverable.
For example, modern carcass saws may have blades around 11 to 14 inches long with roughly 2 inches or more of useful cutting depth, depending on the design.
When comparing carcass saws, record both blade length and tooth configuration because rip and crosscut versions may otherwise look almost identical.
Tenon Saw
A traditional tenon saw is larger and deeper.
Blade length, usable depth, plate thickness, and tooth filing all become important.
A 14- or 16-inch tenon saw can provide much longer strokes than a small dovetail saw.
For large joinery, measure the depth below the back carefully because that dimension directly limits the deepest cheek you can cut.
Sash Saw
The traditional sash saw generally sits somewhere between smaller joinery saws and large tenon saws.
Names vary historically and among manufacturers, so dimensions are more reliable than category names when identifying an unfamiliar saw.
Key Takeaways:
- Measure all backsaws using the same basic heel-to-toe and tooth-line-to-back methods.
- Saw category names can overlap, so actual dimensions are more dependable than labels alone.
- TPI, tooth filing, and cutting depth often tell you more about intended use than blade length alone.
How to Measure a Vintage Back Saw
Vintage saws deserve extra care because their current dimensions may not match their original factory specifications.
A previous owner may have:
- Resharpened the teeth many times
- Jointed away part of the blade
- Shortened a damaged toe
- Replaced the handle
- Modified the back
- Recut the tooth pattern
Begin by measuring the current blade length along the tooth line.
Record it to the nearest useful fraction or inch depending on how accurately you are documenting the saw.
Then measure the depth at both the heel and toe.
This is helpful because some backsaws intentionally taper in depth, while others may have become uneven through wear or repair.
Count the teeth or points per inch.
Finally, inspect the back and blade for maker stamps, etches, medallions, or model markings.
For identification purposes, record measurements rather than assuming that a 13 1/2-inch vintage blade was originally sold as that exact size. It may once have been longer.
Should You Measure Along the Top or Bottom of a Tapered Back Saw?
Measure blade length along the tooth line.
This convention remains useful even when the top edge or spine is angled.
Some tapered backsaws have a plate that is deeper near the heel and shallower toward the toe.
If you measured along the spine instead, the result could differ slightly and would not represent the actual cutting-edge length as clearly.
For complete documentation, measure:
Blade length along the tooth line, depth at the heel, and depth at the toe.
Those three measurements describe a tapered blade much more accurately.
How to Measure a Back Saw for Storage
If you are building a saw till, drawer, toolbox, or protective case, nominal blade length is not enough.
You need the maximum overall dimensions of the complete saw.
Measure from the toe to the end of the handle for overall length.
Then measure the greatest overall height from the lowest tooth to the highest point of the handle or back.
Also consider handle width and any protruding saw nuts.
Add clearance so the tool can be inserted and removed without scraping the teeth.
A saw till should support the tool without placing its full weight on the sharp tooth line.
How to Measure a Back Saw for a Replacement Blade
Replacement blades require more precise measurements.
Blade length alone does not guarantee compatibility.
You may need to record:
- Tooth-line length
- Plate depth
- Plate thickness
- Hole locations for saw nuts
- Hole diameters
- Back slot dimensions
- Handle interface
- Tooth count and filing
On traditional saws, the blade may be mechanically captured by the back and handle in ways that make replacement more complicated than simply ordering another plate with the same length.
If a manufacturer still supports the saw, use the model-specific replacement specification whenever possible.
For a vintage or custom saw, a saw maker may need the old plate as a pattern.
Measuring a Back Saw Before Buying Online
Online saw listings sometimes emphasize different measurements.
One manufacturer may list:
“12-inch saw”
while another gives:
“17 inches overall, 12-inch blade, 2 1/4-inch depth.”
To compare them fairly, focus on the same specifications.
First compare blade length.
Next compare usable depth.
Then compare TPI/PPI and whether the teeth are rip or crosscut filed.
Finally, look at plate thickness, handle design, and overall weight.
This prevents a common mistake: buying two saws with nominally similar blade lengths that are actually intended for very different jobs.
How Back Saw Measurements Affect Cutting Performance
Measurements are not just catalog numbers.
Each dimension changes how the tool behaves.
A longer blade provides a longer stroke. This can speed up larger cuts because more teeth move through the workpiece on each pass.
Greater blade depth increases cutting capacity but can add weight.
A thicker plate increases rigidity but usually creates a somewhat heavier cut.
Fine tooth counts start easily and work well on thin stock. Coarser teeth clear sawdust efficiently in thicker material.
Minimal tooth set creates a narrow, precise kerf, while greater set provides more clearance in difficult material.
The rigid back ties all these features together by keeping the thin plate under control.
This is why two backsaws can share the same 12-inch nominal size yet feel completely different in use.
Common Mistakes When Measuring a Back Saw
The most common mistake is measuring from the blade toe to the end of the handle and calling that the saw’s size.
That is overall length, not blade length.
Another mistake is measuring along the metal back rather than the tooth line.
On a square saw the difference may be minor, but on tapered or unusual designs it can become significant.
People also sometimes measure blade depth from the top of the spine instead of its lower edge. That overstates usable cutting capacity because the workpiece stops against the bottom of the spine.
When counting teeth, make sure you know whether you are recording TPI or PPI.
Finally, do not assume plate thickness equals kerf width. Tooth set usually makes the kerf somewhat wider than the steel plate itself.
What Measurements Matter Most When Choosing a Back Saw?
For most buyers, I would prioritize four specifications.
First is blade length, because it affects stroke length and overall scale.
Second is usable cutting depth, because the saw back physically limits how deep you can cut.
Third is tooth pitch, because it determines how well the saw matches the thickness and type of work you perform.
Fourth is tooth filing, meaning rip, crosscut, or a hybrid configuration.
Plate thickness and kerf become more important when you are comparing premium joinery saws or trying to reproduce particularly fine work.
Overall tool length matters mainly for storage and ergonomics.
A Practical Example of Measuring a Back Saw
Suppose you find an unidentified backsaw in an old toolbox.
Lay it flat and measure the cutting edge from heel to toe.
It measures 14 inches.
Next, measure from the tooth tips to the bottom of the spine.
You get about 2 1/4 inches of usable depth.
Count the teeth over a two-inch section and find 28 teeth.
That works out to approximately 14 teeth per inch under your counting method.
Use a micrometer and find that the saw plate is about 0.020 inch thick.
Finally, measure the complete tool and get roughly 19 inches overall.
You can now describe the saw far more meaningfully than simply calling it “a medium backsaw”:
14-inch blade, approximately 2 1/4-inch cutting depth, around 14 TPI, 0.020-inch plate, and approximately 19 inches overall.
You could then examine the tooth filing and manufacturer markings to determine whether it is most likely a carcass saw, sash saw, or another form of backsaw.
Key Takeaways:
- A complete saw description includes more than nominal blade length.
- Record blade length, usable depth, tooth pitch, and filing when identifying an unknown saw.
- Add plate thickness and overall dimensions when you need precise documentation or replacement parts.
Tools You Need to Measure a Back Saw
You do not need specialized equipment for the basic dimensions.
A good 12- or 24-inch ruler or tape measure handles blade length, cutting depth, and overall length.
A magnifying glass can make fine teeth easier to count.
A digital caliper or micrometer is useful for plate thickness.
If you plan to measure kerf precisely, feeler gauges or more specialized measuring tools can help.
For ordinary woodworking, however, a ruler and good lighting will provide most of the information you actually need.
FAQs about How to Measure a Back Saw
How do you measure the length of a back saw?
Measure along the tooth line from the heel near the handle to the toe at the front of the blade.
Do not include the handle when determining nominal blade length.
Does saw length include the handle?
Usually not when a backsaw is described by blade size.
A “12-inch backsaw” generally refers to approximately 12 inches of blade or cutting-edge length.
Overall length is a separate specification that includes the handle.
Where do you start measuring a backsaw?
For blade length, begin at the heel of the usable cutting edge near the handle and measure to the toe.
Keep the ruler parallel with the tooth line.
How do you measure the depth of a back saw?
Measure perpendicular to the tooth line from the tooth tips to the lower edge of the rigid spine.
That gives you the approximate usable cutting depth.
What does a 12-inch back saw mean?
It normally means the saw has approximately a 12-inch blade or cutting edge.
The complete tool will be longer once the handle is included.
How do you measure TPI on a saw?
Place a ruler along the tooth line and count the teeth over a 1-inch span.
For very fine teeth, count over two inches and divide by two to reduce counting error.
What is the difference between TPI and PPI?
TPI means teeth per inch, while PPI means points per inch.
Because adjacent saw teeth share points, the two counting conventions can differ. Check which measurement system the manufacturer uses.
How do you measure saw blade thickness?
Use a micrometer or accurate digital caliper on a clean, flat section of the saw plate away from the tooth set.
Do not rely on a normal ruler for such a small measurement.
How do you measure the kerf of a backsaw?
Make a controlled cut in stable scrap and measure the resulting slot precisely.
The kerf will normally be somewhat wider than the plate because the saw teeth are set slightly outward.
Is blade thickness the same as kerf?
No.
Blade or plate thickness measures the steel itself. Kerf measures the total width of material removed during the cut and includes the effect of tooth set.
Why is a backsaw’s cutting depth limited?
The rigid spine stiffens the thin blade but eventually contacts the workpiece.
That makes the distance between the tooth line and lower edge of the back the maximum practical cutting depth.
How do I measure a tapered backsaw?
Measure blade length along the tooth line, then record depth separately at the heel and toe.
This shows both the saw’s cutting-edge length and the amount of blade taper.
What size backsaw do I have?
Measure the blade from heel to toe along the teeth.
A measurement close to 10, 12, 14, or 16 inches typically describes the saw’s nominal blade size.
Then measure depth and count the teeth to understand its intended use better.
Can you identify a backsaw only by its length?
Not reliably.
Dovetail, carcass, sash, and tenon saw categories can overlap in size.
Blade depth, TPI, tooth filing, plate thickness, handle design, and manufacturer information provide additional clues.
What is the heel of a backsaw?
The heel is the rear portion of the blade near the handle.
The opposite front end is called the toe.
What is the back or spine of a backsaw?
It is the rigid reinforcement along the upper edge of the saw plate.
The spine keeps the thin blade stiff so it can make precise cuts without buckling.
Conclusion
Knowing how to measure a back saw starts with separating blade size from the other dimensions of the tool. The standard starting point is to measure the cutting edge along the tooth line from the heel near the handle to the toe. Do not include the handle if you are trying to determine nominal blade length.
Next, measure vertically from the tooth tips to the lower edge of the rigid spine. This gives you usable cutting depth, one of the most important backsaw measurements because the back physically limits how far the blade can enter the workpiece.
If you want a complete description, measure the overall tool length, count the TPI or PPI, determine whether the teeth are rip or crosscut filed, and use a micrometer or caliper to measure the saw plate. Kerf can be checked separately because it includes tooth set and is normally wider than the plate itself.
For identifying an unknown or vintage backsaw, I recommend recording blade length, depth at the heel and toe, tooth count, filing, plate thickness, and overall length. Those numbers tell you far more than simply calling the tool a 12- or 14-inch saw.
The most important rule is simple: measure backsaw length along the tooth line, and measure cutting depth from the tooth tips to the bottom of the back. Once you keep those two measurements separate, comparing, identifying, buying, or replacing a backsaw becomes much easier.