How to Use a Tenon Saw With a Bench Hook: Step-by-Step Guide
To learn how to use a tenon saw with a bench hook, place the bench hook against the front edge of your workbench, hold the workpiece firmly against the top stop, align the saw on the waste side of your cut line, and use light, controlled push strokes until the cut is complete. The bench hook supports the wood and resists the forward force of a traditional Western tenon saw, making it much easier to produce straight and square crosscuts.
A bench hook is one of the simplest woodworking aids you can use, but it solves several problems at once. It supports small workpieces, keeps them from sliding while you saw, protects the workbench from the blade, and can provide a useful visual or physical reference for keeping your tenon saw square.
The combination is particularly useful for cutting small boards to length, trimming components, cutting the shoulders of tenons, and performing other accurate crosscuts where holding the work in a vise would be inconvenient.
Good results still depend on technique. Pushing too hard, starting on the wrong side of the line, allowing the workpiece to move, or twisting the saw can quickly turn a square cut into an angled one.
In this guide, I’ll explain how to position a bench hook, hold the workpiece and saw correctly, start and finish a cut, keep the blade square, avoid common mistakes, and use the setup for accurate tenon and general woodworking cuts.
What Is a Bench Hook and Why Use One With a Tenon Saw?
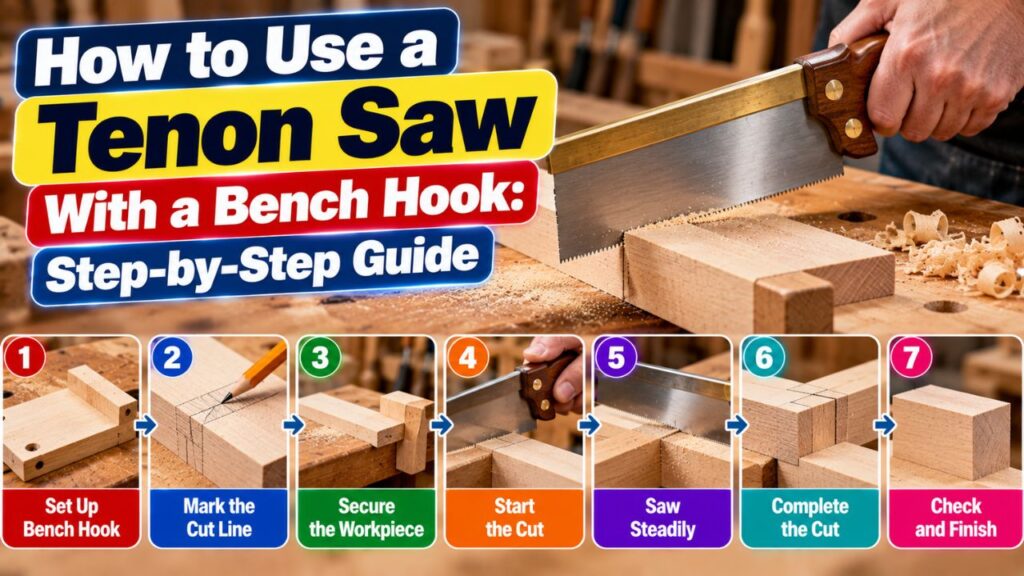
A bench hook is a simple woodworking jig consisting of a flat base with a stop attached to the top and another cleat attached underneath.
The lower cleat hooks over the edge of the workbench. The upper stop supports the workpiece.
When you use a traditional Western tenon saw, most of the cutting force occurs on the push stroke. That forward force pushes the workpiece against the upper stop while simultaneously pushing the lower cleat against the edge of the workbench.
In other words, the harder the normal sawing action pushes forward, the more naturally the bench hook resists movement.
This is why it can hold many small workpieces securely without clamps.
Why a Tenon Saw Works Well With a Bench Hook
A tenon saw is a backsaw. Its reinforced spine keeps the thin saw plate relatively stiff, which helps the blade track accurately.
That makes it particularly suitable for precise joinery and controlled crosscutting.
The bench hook complements the saw by giving you a stable platform and a square reference.
For beginners, this arrangement is often considerably easier than trying to hold a short piece of wood with one hand directly on a workbench while sawing with the other.
Bench Hook vs. Miter Box
A bench hook does not normally trap the saw in predetermined slots the way a miter box does.
Instead, you control the saw yourself.
That gives you more freedom, but it also requires you to develop the ability to keep the blade vertical and follow a marked line.
For learning traditional hand-saw technique, I prefer the bench hook because it helps support the work without completely taking control away from you.
How to Position a Bench Hook Correctly
Correct orientation is the first step.
For a conventional Western tenon saw used on the push stroke, place the bench hook so the bottom cleat catches against the front edge of your workbench.
The top stop should then be positioned farther away from you.
Lay the workpiece flat on the bench-hook base and push its edge firmly against that upper stop.
The end you want to cut should normally project beyond the side of the bench hook.
Many bench hooks have a top stop that is intentionally shorter than the width of the base. This leaves an open section where the saw can travel without cutting directly through the stop.
Your saw should operate in that open area.
Right-Handed and Left-Handed Setup
A typical right-handed woodworker holds the tenon saw in the right hand and steadies the workpiece with the left.
The cutting line is positioned near the appropriate open side of the bench hook so the saw can move freely.
A left-handed user can reverse the arrangement or use a bench hook designed to allow sawing from either side.
What matters is that your non-sawing hand can hold the work securely without crossing the blade path.
What About a Japanese Pull Saw?
A traditional Western tenon saw normally cuts on the push stroke, which naturally pushes the bench hook against the bench edge.
A Japanese saw generally cuts on the pull stroke.
If you are using a pull saw rather than a Western tenon saw, the holding forces are reversed, so the bench-hook arrangement may need to be reversed or secured differently.
For the technique in this article, I am referring primarily to a standard Western-style tenon saw.
Key Takeaways:
- Put the lower bench-hook cleat against the front edge of the bench when using a Western push-cut tenon saw.
- Keep the workpiece firmly against the top stop and position the cut beyond the open side of the bench hook.
- Keep your supporting hand completely clear of the saw path.
How to Use a Tenon Saw With a Bench Hook Step by Step
Once the bench hook is positioned correctly, the actual sawing process is straightforward.
Accuracy comes from careful marking, a controlled start, and allowing the saw to cut without excessive force.
Step 1: Mark the Cut Precisely
Measure the workpiece and mark the cut using a sharp pencil or, preferably for fine joinery, a marking knife.
Use a try square or combination square to carry the line across the face of the board.
If the cut must be very accurate, a knife line is particularly helpful.
A knife physically severs the surface fibers and creates a tiny groove that can help the saw begin in the correct place.
Mark the waste side as well. A small pencil X is enough.
This prevents the surprisingly common mistake of sawing away the portion you intended to keep.
Step 2: Put the Workpiece Against the Bench-Hook Stop
Place the board flat on the bench hook.
Push it firmly against the upper stop.
Position the cut line slightly beyond the end of the stop so the saw has room to work.
The waste portion should usually extend over the open side.
Make sure the workpiece is sitting flat. A chip or pile of sawdust underneath the board can tilt it and affect the cut.
The same applies to the rear stop. Sawdust trapped between the workpiece and stop can prevent the work from registering squarely.
A quick brush with your hand before positioning the piece helps avoid this problem.
Step 3: Hold the Workpiece Securely
Use your non-dominant hand to hold the board down and back against the stop.
You generally do not need excessive pressure.
The bench hook is designed so that the push action of the saw helps press the work against the stop.
Keep your fingers well away from the cutting line.
Do not place your thumb directly next to the blade once the saw begins moving.
For a particularly small, awkward, or valuable piece, use a clamp or another appropriate holding method rather than putting your fingers close to the teeth.
Step 4: Place the Saw on the Waste Side of the Line
This is critical for accurate work.
The saw kerf—the material removed by the saw teeth—has measurable width.
If you center the blade directly over the finished-size line, you remove part of the material you intended to keep.
Instead, position the blade just on the waste side of the line.
For fine joinery, try to leave the knife or pencil line on the finished piece.
You can always remove a tiny amount afterward with a plane or chisel.
Adding wood back is much harder.
Step 5: Start With Short, Light Strokes
Do not attack the workpiece with full-length strokes immediately.
Start near the edge of the wood with a few short, gentle movements to establish a kerf.
Use very little downward pressure.
Let the teeth do the work.
Once the kerf is established, gradually increase the stroke length.
A properly sharpened tenon saw should not require you to force it downward.
Excessive pressure often makes the blade wander and makes the saw feel harder to control.
Step 6: Keep the Blade Vertical
Look at the saw plate from above and from the side as you work.
The blade should remain vertical if you want a square end.
The rigid back of a tenon saw helps, but it cannot prevent you from tilting the entire tool.
Use a relaxed grip.
Your arm, wrist, and saw should move in a smooth line.
Do not try to correct every tiny movement by twisting your wrist.
If the blade begins drifting noticeably, stop and make a gentle correction rather than forcing it sideways while it is buried in the kerf.
Step 7: Use Smooth Full Strokes
Once the cut is established, use more of the saw blade.
Long, smooth strokes usually produce a straighter cut and use the teeth more evenly than short, aggressive chopping motions.
Keep the saw moving in the same plane.
Avoid pushing down hard.
The saw should feel like it is moving forward and backward through the kerf rather than being forced vertically into the wood.
Step 8: Slow Down Near the End
As you approach the underside of the board, reduce your speed and pressure.
The final fibers are poorly supported and can tear away if you finish aggressively.
Shorter, lighter strokes give you better control.
You can also support the waste piece if necessary, provided your hand remains safely away from the blade.
Let the saw complete the cut rather than snapping the waste away.
That produces a cleaner edge.
How to Keep a Tenon Saw Square on a Bench Hook
Cutting square is one of the main reasons to use this setup, but the bench hook cannot completely compensate for poor sawing technique.
There are two dimensions you need to control.
The cut must be square across the width of the board and square through its thickness.
Use the Stop as a Reference
A well-made bench hook should have its upper stop mounted at 90 degrees to the appropriate edge of the base.
When your board sits firmly against that stop, the end of the stop provides a visual reference for a square cut.
Some woodworkers position the saw very close to the end of the stop and use that surface as an additional guide.
Do not continually cut into the stop unless the bench-hook design is intended for that use.
Watch the Reflection in the Saw Plate
A polished saw plate can provide a useful visual clue.
When the blade is held square to the workpiece, the reflection of the board can appear to continue in a straight line.
If the reflection looks angled, the saw may be tilted.
This technique takes practice, but it can become surprisingly useful.
Check Your Work
After making a practice cut, place a try square against the end of the board.
Check both the face and edge.
If your cuts consistently lean in one direction, pay attention to your stance and wrist position on the next attempt.
Do not simply blame the saw.
Many beginners naturally tilt their hand slightly inward or outward without realizing it.
Key Takeaways:
- Start lightly and establish the kerf before using long strokes.
- Keep the blade on the waste side of the line and avoid forcing the saw downward.
- Check finished cuts with a square so you can identify and correct consistent technique errors.
How to Hold a Tenon Saw Correctly
A tenon saw should not be gripped like a hammer.
Use a controlled but relaxed grip.
Wrap your lower fingers around the handle and point your index finger forward along the side of the handle if the handle shape comfortably allows it.
This helps orient the saw and often improves directional control.
Avoid squeezing the handle excessively.
A tight grip can stiffen your wrist, forearm, and shoulder, making it harder to maintain a smooth stroke.
Your goal is to guide the saw rather than overpower it.
Stand in Line With the Cut
Your stance matters more than many beginners expect.
Position yourself so your sawing arm can move naturally backward and forward in approximately the same plane as the cut.
If you stand too far to one side, your arm may swing in an arc and pull the blade away from the line.
Keep your body balanced and the work at a comfortable height.
The exact stance varies between woodworkers, but you should not feel as though you are reaching awkwardly across the bench.
Should the Tenon Saw Touch the Bench-Hook Stop?
It can, depending on the bench-hook design and the cut you are making.
The end of a correctly squared stop can serve as a useful guide for the side of a backsaw.
This can help keep the blade vertical and the cut square.
However, repeatedly rubbing the saw teeth against the stop will gradually cut into it.
That is normal on many traditional bench hooks—they are shop jigs and eventually wear out.
Some woodworkers deliberately create a kerf or relieved area for the saw.
Others keep the blade just clear of the stop and use it only as a visual reference.
I prefer not to force the saw against the guide. Light contact is enough if you are using the stop to help maintain alignment.
How to Use a Bench Hook for Cutting Tenon Shoulders
Despite its name, a tenon saw is useful for more than cutting tenon cheeks.
A bench hook is especially convenient when cutting the shoulder lines of a tenon across the grain.
After marking the tenon accurately with a marking gauge, knife, and square, place the workpiece flat against the bench-hook stop.
Align the shoulder line so the saw can cut immediately on the waste side.
Use light strokes to establish the kerf.
Saw down toward the cheek line without cutting beyond it.
Rotate the work as necessary to cut the remaining shoulders.
For precision joinery, it is usually better to leave a very small amount of material for final trimming than to saw past the shoulder line.
A shoulder plane or sharp chisel can refine the surface afterward.
Do Not Cut Past Your Layout Lines
Overcutting the shoulder can create a visible gap after the mortise-and-tenon joint is assembled.
Watch both the face and edge layout lines as you approach the bottom of the cut.
Good tenon work is less about speed than stopping exactly where you intended.
How to Start a Tenon Saw Without It Jumping
If the saw skips across the surface when you try to begin, you are probably using too much pressure.
Reduce the downward force substantially.
Place the teeth at the waste side of your line and make a few very short strokes.
A sharp knife line can help considerably.
You can also deepen the waste side of a knife line slightly with a chisel to create a tiny guide wall for particularly precise work.
Once the saw has created a shallow kerf, it will track much more easily.
A dull or poorly set saw can also make starting difficult, so if your technique seems correct but the saw continually skates or binds, inspect its condition.
Common Mistakes When Using a Tenon Saw With a Bench Hook
The first common mistake is putting the bench hook the wrong way around.
With a normal Western push saw, the lower hook needs to resist the forward cutting force against the workbench edge.
Another frequent problem is failing to press the workpiece fully against the upper stop. Even a small gap can allow the board to move while you cut.
Beginners also tend to use excessive downward pressure. That does not make a sharp saw cut more accurately. It usually makes it harder to steer.
Sawing directly on the finished-side line is another problem. Remember that the blade removes material. Keep the kerf primarily in the waste.
Finally, do not attempt to correct a wandering cut by aggressively twisting the saw. This can bend the blade or widen the kerf. Stop, reassess your alignment, and continue carefully.
Using a Bench Hook With Long or Wide Workpieces
A normal bench hook works best with relatively small pieces.
Long boards need additional support so the unsupported end does not tip or rotate.
You can place another bench hook, support block, or appropriately sized support under the far end, provided everything remains at the same height.
For a board that is wider than the bench hook, you may still be able to use the hook as a registration and sawing reference while supporting the rest of the workpiece securely on the bench.
If the board becomes difficult to control with hand pressure alone, clamp it.
A bench hook is a convenient holding aid, not a requirement to avoid clamps at all costs.
What Type of Cuts Can You Make?
A tenon saw and bench hook are particularly well suited to precise crosscuts.
Typical uses include cutting small components to length, squaring board ends, cutting joinery shoulders, trimming narrow stock, and making repeated small workshop cuts.
A basic bench hook is designed primarily for 90-degree cuts.
For repeated 45-degree cuts, a miter box or a bench hook specifically constructed with a 45-degree guide is usually easier and more repeatable.
A tenon saw can also be used for rip-oriented joinery cuts such as cutting tenon cheeks, but those cuts often require the workpiece to be held in a vise or positioned differently rather than simply lying flat on a standard bench hook.
Tenon Saw and Bench Hook Safety
A hand saw is quieter and slower than a power saw, but its teeth can still cause a serious cut.
Keep the supporting hand behind and well away from the blade path.
This is especially important with small workpieces where it is tempting to hold the wood close to the cut.
If the piece is too small to hold confidently, clamp it or use a different jig.
Make sure the bench hook is resting securely against the workbench and cannot rock.
Do not use a damaged bench hook with a loose stop.
Inspect the tenon saw as well. A loose handle or damaged blade makes accurate control more difficult.
Keep the work area clear so you can use a full sawing stroke without hitting another object.
Eye protection is sensible when sawing, particularly when working with brittle material or when chips may be produced.
Most importantly, do not hurry the final part of the cut. Loss of control often occurs when the waste piece suddenly separates.
Key Takeaways:
- Keep your free hand out of the blade path and clamp any workpiece that feels too small or unstable to hold safely.
- Slow down near the end of the cut to reduce tear-out and prevent sudden loss of control.
- A secure, square bench hook is just as important as a sharp, well-controlled saw.
How to Get Cleaner and More Accurate Cuts
Accurate sawing starts before the blade touches the wood.
Use a sharp marking knife and a reliable square for precision work.
Make sure the bench-hook fence is actually square. If the fence itself is crooked, using it as a reference will reproduce that error in every cut.
Keep the surface clean.
A surprisingly small chip trapped behind the workpiece can change its angle.
The condition of the saw matters too. A sharp, properly set tenon saw should cut without excessive effort.
If the blade constantly pulls strongly to one side despite good technique, the tooth set or sharpening may be uneven.
Finally, practice on scrap.
Make several cuts, check each one with a square, and deliberately adjust your stance and grip.
Hand-saw accuracy improves quickly when you use immediate feedback rather than simply making more cuts without checking them.
Tenon Saw vs. Other Saws on a Bench Hook
A tenon saw is not the only saw you can use with a bench hook.
A smaller backsaw can be excellent for delicate components, while a carcass saw is particularly well suited to crosscutting.
Japanese pull saws can also make extremely accurate cuts, although their cutting direction changes how forces act on a traditional bench hook.
The tenon saw remains a good general choice when you need a stiff blade, accurate joinery cuts, and enough depth for medium-size work.
If your primary job is very fine crosscutting, a smaller backsaw may feel more controllable.
If you are cutting large boards, a full-size hand saw or different workholding arrangement may be more practical.
The best saw is the one whose tooth pattern, depth, and size suit the cut you are actually making.
FAQs about How to Use a Tenon Saw With a Bench Hook
What is a bench hook used for with a tenon saw?
A bench hook supports and steadies the workpiece while you saw. Its lower cleat catches the edge of the workbench, while its upper stop prevents the wood from moving forward.
It is particularly useful for accurate crosscuts and tenon shoulders.
Which way should a bench hook face?
When using a conventional Western tenon saw that cuts on the push stroke, the bottom cleat should hook against the front edge of the workbench. The top stop should be farther away from you so the forward sawing force presses the work into it.
Does a tenon saw cut on the push or pull stroke?
A conventional Western tenon saw cuts primarily on the push stroke.
Japanese backsaws generally cut on the pull stroke and may require a different bench-hook orientation or holding arrangement.
Do you need to clamp wood to a bench hook?
Usually not for ordinary small crosscuts.
Your non-sawing hand holds the workpiece against the stop, while the forward sawing force helps keep it there.
Clamp the work if it is awkward, unstable, long, or too small to hold safely.
Which side of the line should I saw on?
Saw on the waste side.
Try to preserve the marked line on the finished component so you do not accidentally make the piece undersized.
How do I stop a tenon saw from wandering?
Begin with short, gentle strokes, use little downward pressure, keep your wrist relaxed, and align your body with the cut.
Once the initial kerf is straight, use smooth full strokes.
Why is my cut not square?
Possible causes include a bench-hook stop that is not square, a tilted saw blade, poor stance, excessive pressure, or movement of the workpiece.
Check the cut with a try square and determine whether the error is across the face or through the thickness.
Should I push hard on a tenon saw?
No.
A sharp tenon saw should cut with relatively little downward pressure. Your job is primarily to move and guide the saw.
Forcing it can cause wandering and make the cut less accurate.
Can I use a tenon saw for cutting tenon shoulders?
Yes. A tenon saw and bench hook are a traditional and effective combination for cutting tenon shoulders.
Stay on the waste side and avoid cutting beyond your layout lines.
Can I cut a tenon completely on a bench hook?
The bench hook is particularly useful for shoulder cuts and some trimming operations.
Tenon cheek cuts are often easier with the workpiece held vertically or horizontally in a vise, depending on the technique.
Can I use a bench hook for 45-degree cuts?
A standard bench hook is primarily intended for square cuts.
You can make or buy a version with a 45-degree guide, but a miter box or dedicated mitering jig may be easier for repeated angled cuts.
Why does the saw jump when I start the cut?
You are probably using too much downward force or trying to use long strokes before establishing a kerf.
Begin with very light, short strokes and increase their length once the saw is tracking correctly.
How do I prevent splintering at the end of the cut?
Slow down as you approach the bottom of the workpiece and use lighter, shorter strokes.
Support the waste when practical without placing your hand in the blade path.
Can beginners use a tenon saw with a bench hook?
Yes. In fact, I consider a bench hook one of the best aids for learning accurate hand sawing because it holds the work securely while still allowing you to develop control of the saw yourself.
Conclusion
Learning how to use a tenon saw with a bench hook comes down to correct setup, accurate marking, and controlled sawing rather than strength.
Position the lower hook against the front edge of the workbench, place the board firmly against the upper stop, and let the end being cut project into the clear sawing area. Mark the cut carefully and position the saw on the waste side of that line.
Begin with short, light strokes until you establish a clean kerf. Then use smooth, longer strokes while keeping the blade vertical. Do not push down hard; a sharp tenon saw should do the cutting with surprisingly little pressure.
As you reach the end, slow down to prevent tear-out and loss of control. Check the finished cut with a square and use any error as feedback for your next attempt.
For beginners, I strongly recommend practicing this technique on a few pieces of scrap before cutting important joinery. A tenon saw and bench hook are simple tools, but once you learn to use them together properly, they can produce extremely accurate crosscuts and joinery with very little setup.