Can You Cut Plastic with a Table Saw: Clear Answers and Key Facts
Many people assume plastic is too soft for a table saw, while others treat it exactly like plywood. Both assumptions can lead to poor results. A table saw can cut many rigid plastics cleanly, but the material’s type, thickness, blade, feed rate, and support determine whether the cut is smooth or melted and chipped.
If you are asking, can you cut plastic with a table saw, the short answer is yes—often safely and accurately when the setup matches the plastic. I’ll explain which plastics are suitable, how to choose a blade, how to reduce melting and cracking, and when another tool is the better choice.
The most important idea is that plastic does not behave like wood under a spinning blade. Friction can soften or melt it, vibration can crack it, and chips can bind in the cut. A controlled setup matters more than simply installing a blade and pushing the sheet forward.
Can You Cut Plastic with a Table Saw?
Yes, a table saw can cut many rigid plastic sheets, panels, and boards. Common examples include acrylic, polycarbonate, high-density polyethylene (HDPE), ultra-high-molecular-weight polyethylene (UHMW), PVC sheet, ABS, and some solid-surface materials. The table saw is especially useful for long, straight cuts in flat stock.
However plastic describes a large family of materials Acrylic is relatively rigid but can chip or crack Polycarbonate is tougher and less brittle but it may produce stringy.
I view the table saw as a good choice when the workpiece is flat, stable, and large enough to control against the fence. For small pieces, curved cuts, very thin film, or delicate finished edges, a jigsaw, circular saw, router, scoring tool, or plastic fabricator may be more appropriate.
Which Plastics Work Best on a Table Saw?
The material’s hardness, brittleness, thickness, and melting behavior affect the cut. Before starting, check the product label or manufacturer’s cutting instructions. If the sheet is coated, laminated, filled with glass fibers, or made from an unfamiliar composite, its cutting behavior may differ significantly from ordinary plastic.
| Plastic | Typical table saw behavior | Main concern |
|---|---|---|
| Acrylic | Produces straight, precise cuts when well supported | Chipping, cracking, and edge melting |
| Polycarbonate | Tough and less likely to shatter than acrylic | Heat buildup, burrs, and stringy chips |
| HDPE | Easy to cut but somewhat flexible | Melting, dragging, and movement at the fence |
| PVC sheet | Usually cuts predictably with a sharp blade | Dust, fumes from overheating, and brittle edges in some grades |
| ABS | Generally machines cleanly | Melting and roughness from a dull blade |
| UHMW plastic | Can be cut accurately with firm support | Softening, flexing, and a tendency to pinch the blade |
Acrylic and plexiglass
Acrylic, often sold as plexiglass, is rigid and commonly used for windows, guards, displays, and panels. It can produce a clean table-saw edge, but it is also prone to chipping if the blade is dull, the sheet vibrates, or the feed is uneven.
Keep protective masking on the surface during cutting when possible. The masking helps reduce scratches and can limit minor surface damage, although it does not replace proper support. Acrylic can also crack from a small notch at the edge, so inspect the sheet and avoid forcing it through a blade.
Polycarbonate
Polycarbonate is impact-resistant and usually less brittle than acrylic. That toughness makes it less likely to shatter, but it can generate stringy chips or soften around the kerf if the blade rubs instead of cutting.
Use firm support and maintain a steady feed. After cutting, remove a small burr with a fine file, deburring tool, or appropriate abrasive if the edge will be handled or fitted into another part.
HDPE, UHMW, and other flexible plastics
HDPE and UHMW plastic are soft and slippery compared with acrylic. A large sheet may flex away from the fence or lift as the blade exits. That movement can create an inaccurate edge and increase the chance of kickback.
Support the sheet across its entire width whenever possible. A temporary auxiliary table, outfeed support, or second person positioned safely away from the blade may be necessary for large panels. Never allow a helper to pull the workpiece through or stand in the kickback path.
Choose the Right Blade
Blade selection has a direct effect on melting, chipping, and edge quality. A sharp, high-quality carbide blade is usually a better starting point than a general-purpose blade that has already spent years cutting construction lumber.
Tooth count and tooth shape
A blade with more teeth generally leaves a smoother edge but tooth count is not the only factor Too many teeth can increase friction and restrict chip clearance.
A sharp carbide-tipped blade with a suitable grind is commonly preferred. Some plastic manufacturers recommend a triple-chip grind or a blade specifically labeled for plastics, acrylic, or nonferrous materials. I would follow the blade and plastic manufacturer’s guidance rather than assuming that the highest tooth count is always best.
Blade condition
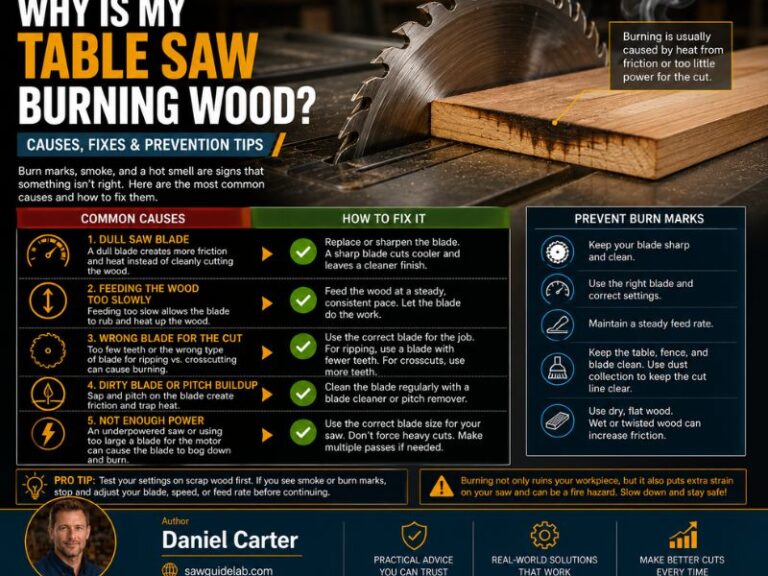
A dull blade creates heat because it rubs and pushes instead of slicing. It may leave a white, rough, or melted edge and can force the operator to slow the feed excessively. Inspect the teeth before cutting, and replace or sharpen the blade if the tips are damaged, dirty, or visibly worn.
Do not use a blade with a bent plate, missing carbide, or a damaged arbor hole. Plastic can catch unpredictably when the blade does not run true.
Blade height
Set the blade only high enough to clear the material by a modest amount Excessive exposure increases the amount of tooth surface entering the workpiece and can worsen.
Prepare the Table Saw and Workpiece
Good preparation reduces both quality problems and safety risks. I would not begin with the plastic resting loosely on a dusty table or with a fence that is difficult to lock. Plastic sheets can slide easily, and small particles under the workpiece can affect the cut.
Clean and inspect the saw
- Clear the tabletop, miter slot, and area around the saw.
- Check that the blade is sharp, properly installed, and compatible with the saw.
- Confirm that the riving knife or splitter is correctly aligned with the blade.
- Verify that the fence is parallel to the blade and locks firmly.
- Test the blade guard and anti-kickback components if the saw uses them.
- Make sure the power switch is easy to reach before beginning the cut.
A riving knife is particularly valuable because it helps keep the kerf from closing around the back of the blade. Do not remove safety equipment simply to make a particular cut easier unless the tool manufacturer provides a specific, safe procedure for that operation.
Support the sheet
Large plastic sheets need support before they touch the blade If the material sags the cut can wander the sheet can pinch the blade or the offcut can.
Support the offcut too, but do not trap it between the blade and the fence in a way that allows it to bind. For a rip cut, the fence controls the retained workpiece. The waste side must be able to separate without twisting back into the blade.
Mark and protect the cut
Use a fine marker, pencil, or masking tape to mark the cut line. On clear acrylic, tape can make the line easier to see and reduce surface scratching. Measure from a reliable edge, and account for the blade kerf if the final dimension matters.
Do not assume that factory edges are perfectly straight. If the first edge is inaccurate, reference the fence from a verified straight edge or trim the sheet before making precision cuts.
How to Cut Plastic on a Table Saw
- Read the material instructions. Confirm that the sheet is suitable for sawing and note any recommended blade, feed, or cooling guidance.
- Plan the cut. Decide which side is the finished face, identify the retained piece, and check that the sheet has adequate support.
- Set the fence and blade. Align the fence parallel to the blade and set the blade height for controlled clearance above the workpiece.
- Put on suitable protection. Wear safety glasses or a face shield, hearing protection, and footwear that provides stable footing. Avoid loose clothing and jewelry.
- Start the saw and let it reach full speed. Do not place the plastic against a blade that is still accelerating.
- Feed at a steady rate. Push firmly enough to keep the material moving, but do not force it. Avoid stopping in the middle of the cut if the plastic is heating in the kerf.
- Keep your hands out of the blade path. Use a push stick, push block, or other suitable aid as the workpiece approaches the blade.
- Finish the cut without reaching over the blade. Continue supporting the material until it has fully cleared the blade, then turn off the saw and wait for the blade to stop.
- Inspect the edge. Let the plastic cool before judging whether it needs light deburring or finishing.
The feed should be smooth rather than hesitant. Feeding too slowly can let the teeth rub and build heat, while feeding too aggressively can chip brittle plastic or overload the motor. The correct rate depends on material thickness, blade geometry, and saw power, so I recommend making a test cut in scrap first.
How to Prevent Melting
Heat buildup is the most common reason a plastic table-saw cut looks melted instead of machined. The blade generates friction as it enters and exits the material. A dull blade, slow feed, excessive tooth count, poor chip clearance, or repeated passes through the same kerf can raise the temperature quickly.
Use a sharp blade and steady feed
A sharp tooth removes material efficiently. Maintain a consistent feed instead of pausing every few inches. If the motor begins to labor, stop safely and diagnose the setup rather than pushing harder. The problem may be a misaligned fence, an overly thick sheet, a dull blade, or insufficient support.
Allow chips to clear
Plastic chips trapped in the kerf can rub against the blade and transfer heat back into the edge. Keep the cut area clear with appropriate dust collection or carefully directed air if the tool and material instructions allow it. Avoid blowing chips toward your face or into the motor and bearings.
Do not apply an improvised liquid lubricant to a table saw unless the plastic, blade, and saw manufacturers specifically approve it. Liquids near electrical equipment create additional hazards, and some substances can damage plastic or contaminate the blade.
Make one clean pass
Repeatedly running the material through an existing kerf can increase rubbing. If a cut must be widened, adjust the setup and make a controlled second operation only when the workpiece can remain securely supported. Never freehand a second pass beside the blade.
How to Get a Cleaner Plastic Edge
A clean edge begins with accurate cutting, but the final appearance also depends on the plastic. Transparent acrylic may show small chips more clearly than opaque HDPE, and a slightly rough edge may be acceptable for a hidden joint but not for a display panel.
Reduce vibration
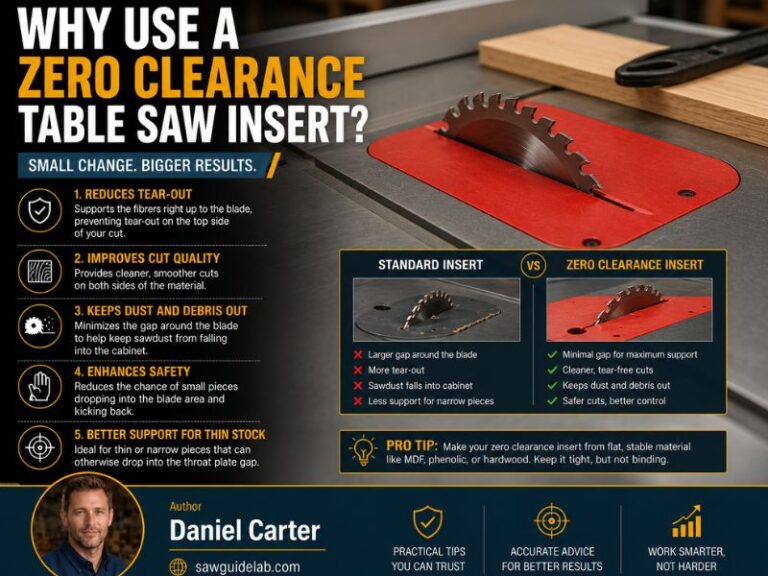
Vibration is a major cause of chipped edges. Keep the sheet flat against the table and fence without pressing it so hard that it bows. For thin stock, a properly designed zero-clearance insert or auxiliary support may reduce the gap around the blade, but it must not interfere with blade movement or guard operation.
Use masking and a sacrificial surface
Protective film or painter’s tape can reduce scratches on the finished face. A sacrificial backing board may help support thin material, but it changes the cutting depth and must be compatible with the blade and saw setup. Never use a backing method that can lift, shift, or become trapped against the fence.
Finish the edge carefully
Remove a small burr with a deburring tool, scraper, fine file, or suitable sandpaper. Use light pressure because aggressive sanding can round a straight edge or create visible haze on clear plastic. Flame polishing and solvent polishing are specialized processes that require material-specific knowledge and ventilation; they are not necessary for most table-saw projects.
Safety Risks to Take Seriously
Plastic cutting has the same basic table-saw hazards as woodcutting, including kickback, contact with the blade, flying fragments, and hearing damage. It also introduces material-specific concerns such as melted chips, sharp edges, and fumes from overheating or burning.
- Wear eye protection even when the blade guard is installed.
- Use respiratory protection only as part of a suitable dust-control plan; a mask does not make poor ventilation safe.
- Use dust collection when compatible with the plastic and saw.
- Keep hands away from the blade and use a push device for narrow cuts.
- Stand slightly to the side of the blade’s kickback line, not directly behind the workpiece.
- Do not cut material that contains unknown coatings, adhesives, or chemical residues.
- Stop immediately if the plastic smokes, burns, gives off an unusual odor, or begins binding.
- Let hot chips and the cut edge cool before handling them.
PVC deserves particular caution because overheating can produce unpleasant or hazardous decomposition products. Avoid burning the material, provide appropriate ventilation, and follow the manufacturer’s safety information. If the plastic’s composition is unknown, identify it before cutting rather than relying on its color or appearance.
Never hold a small plastic piece by hand close to the blade. If the part is too small to control safely against the fence, change the design, use a different tool, or create a secure jig designed for the operation.
Common Mistakes and Their Fixes
Using a dull general-purpose blade
A blade that still cuts wood may be unsuitable for plastic. If the edge is melted, ragged, or discolored, inspect the blade before changing your feed technique. A purpose-selected, sharp blade often solves more problems than additional sanding.
Feeding too slowly
Slow feeding feels cautious, but it can keep the teeth rubbing in one place. This is especially common when the operator is worried about cracking acrylic. Maintain a controlled, continuous movement and practice on scrap until the motion feels predictable.
Forcing the workpiece
Forcing a sheet can cause chipping, blade deflection, and kickback. If resistance increases, stop using the correct shutoff procedure and find the cause. Do not push harder simply to complete the cut.
Letting the sheet sag
A sagging panel can pinch the blade or pull away from the fence. Add support before cutting, not after the material begins to move. Large sheets may require more space than the saw table alone can provide.
Ignoring the offcut
The waste piece can rotate, fall, or contact the rear teeth. Plan where it will go before starting. Never reach over the blade to catch it while the saw is running.
Removing the protective film too early
Clear plastic scratches easily. Leave the factory film on during machining when it does not interfere with the fence or cut line. Remove it afterward and inspect the surface under good lighting.
When Another Tool Is Better
A table saw is efficient for straight cuts but it is not the universal plastic-cutting tool A scoring knife can work for some thin acrylic sheets especially when.
A band saw can be a better option for thicker plastic or curves. A router can trim an edge, create a profile, or follow a template, but it generates chips and requires careful workholding. For small, intricate parts, a CNC router or plastic service may provide better repeatability.
I would choose another method when the sheet is too small to control the cut is curved the plastic is extremely thin the edge must be optically perfect.
FAQ About Cutting Plastic with a Table Saw
Can you cut acrylic plastic with a table saw?
Yes. Acrylic can be cut on a table saw with a sharp blade suited to acrylic or plastics, stable support, and a steady feed. Keep the protective film in place when practical, and avoid vibration because acrylic can chip or crack.
What table-saw blade is best for plastic?
A sharp carbide blade labeled for plastics, acrylic, or nonferrous materials is a strong starting point. Blade tooth count and grind should match the plastic and thickness. Follow the plastic manufacturer’s recommendation when it differs from general blade guidance.
Why does plastic melt when I cut it on a table saw?
Plastic usually melts because friction creates too much heat. Common causes include a dull blade, a very slow feed, excessive tooth contact, poor chip clearance, blade misalignment, or a cut that is paused repeatedly. A sharp suitable blade and smooth feed can reduce the problem.
Should the blade be high or low when cutting plastic?
Set the blade high enough to clear the material with controlled exposure, but do not raise it unnecessarily far. The saw and blade manufacturer’s instructions take priority. Excessive blade height can increase exposure and may worsen the result of a catch.
Can a table saw cut thin plastic sheets?
It can, but thin sheets are more likely to flex, vibrate, lift, or bind. Use full support and a secure method of control. If the sheet is too small or flexible to remain flat and stable, a scoring tool, shears designed for the material, or another cutting method may be safer.
Is it safe to cut PVC plastic on a table saw?
PVC can be cut on a table saw, but it should not be overheated or burned. Control dust and ventilation, avoid unknown PVC compounds or coatings, and follow the product’s safety instructions. Stop if the material smokes or produces an unusual odor.
Conclusion
Yes can you cut plastic with a table saw is a practical question with a practical answer many rigid plastics can be cut successfully when the blade support.