How to Cut Wood With a Tenon Saw: Step-by-Step Guide
If you want to know how to cut wood with a tenon saw, mark the cut accurately, secure the wood firmly, place the saw on the waste side of the line, start with a few light strokes, and then use smooth, controlled movements while keeping the blade vertical and aligned with your mark. A tenon saw is especially useful when you need straight, precise cuts for woodworking joints such as tenons, lap joints, and other joinery.
The reinforced metal or rigid spine along the top of a tenon saw keeps its relatively thin blade stiff during cutting. This makes it easier to produce controlled, square cuts than with many general-purpose hand saws. Its fine teeth also leave a cleaner cut, although the saw is not designed for deep cuts through very thick pieces of lumber.
Good results depend less on strength and more on accuracy. Pushing aggressively can make the blade wander, while starting on the wrong side of a pencil line can make a carefully measured joint too small. The best technique is to let the teeth do the work while using your hand mainly to guide the saw.
In this guide, I’ll explain how to cut wood with a tenon saw step by step, how to mark and secure your workpiece, where to position the blade, how to start without slipping, how to keep the cut square, how to cut tenons, and how to avoid the mistakes that commonly ruin hand-sawn joinery.
What Is a Tenon Saw?
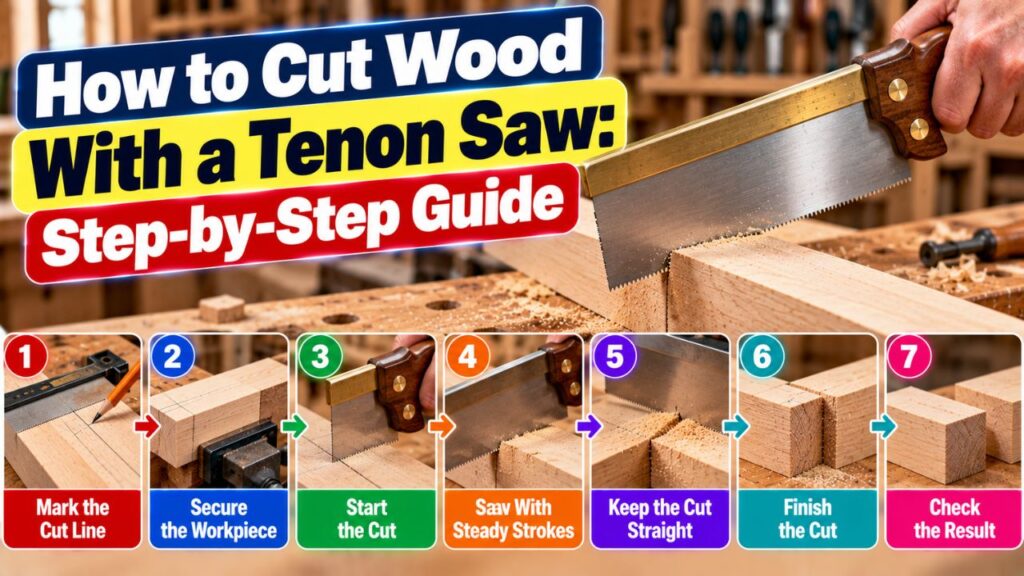
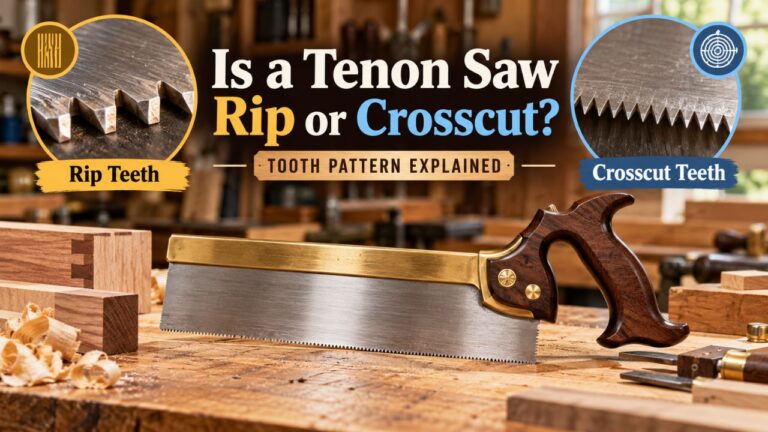
A tenon saw is a type of backsaw designed for accurate woodworking cuts.
Unlike a general-purpose hand saw, it has a rigid spine running along the top edge of the blade. This spine prevents the blade from flexing excessively and helps you maintain a straight cutting line.
Tenon saws generally have relatively fine teeth and are commonly used for cutting:
- Tenon shoulders and cheeks
- Lap joints
- Small pieces of hardwood or softwood
- Straight crosscuts
- Precise joinery components
Because the reinforced back limits how deeply the blade can enter the workpiece, a tenon saw is best suited to relatively shallow, controlled cuts rather than ripping through large construction lumber.
Why a Tenon Saw Gives Accurate Cuts
The blade of a normal panel saw is flexible because it has no reinforcing spine.
A tenon saw’s stiff back makes the cutting plate much more resistant to twisting. That allows you to follow a layout line with greater precision.
The finer tooth pattern also removes less material with each tooth, which usually produces a smoother edge.
This is why a tenon saw is much better suited to cabinetmaking and joinery than rough construction work.
How to Cut Wood With a Tenon Saw
The basic process is straightforward, but accuracy comes from paying attention to each stage.
You need to measure carefully, establish a clear cutting line, secure the workpiece, start the kerf correctly, and maintain the saw’s alignment while cutting.
Step 1: Measure and Mark the Cut
Begin with an accurate measurement.
Use a sharp pencil for ordinary cuts. For fine joinery, a marking knife can create a thinner and more precise reference line.
If you are making a square crosscut, use a try square or combination square to carry the line across the face and edge of the workpiece.
For a tenon, mark the shoulder line around the relevant faces and mark the cheek positions carefully.
Do not assume you will be able to correct an inaccurate layout while sawing. A precise cut begins with a precise mark.
Step 2: Identify the Waste Side
Before placing the saw on the wood, determine which side of the line is waste.
The saw blade removes material and creates a gap called the kerf.
If you cut directly down the center of your finished-size line, part of the required wood disappears with the kerf.
Instead, position the blade on the waste side while preserving your layout line.
For accurate joinery, I prefer to leave the line visible and make any final adjustment with a chisel, shoulder plane, or other suitable tool if necessary.
Step 3: Secure the Workpiece
Clamp the wood securely to a workbench or hold it in a woodworking vise.
The workpiece should not vibrate, slide, or rotate while you cut.
Position the cutting line close enough to the support that the wood remains stable, but leave enough clearance for the saw blade to move freely.
If the workpiece is poorly supported, you may spend more effort controlling the wood than controlling the saw.
Step 4: Position Your Body Correctly
Stand comfortably with the saw roughly aligned with your forearm.
Your shoulder, elbow, wrist, and saw should be able to move naturally along the same cutting path.
Avoid twisting your wrist to force the blade straight.
Good body alignment makes it much easier to saw accurately because the tool naturally travels in the direction of your arm movement.
Step 5: Place the Saw on the Waste Side of the Line
Set the teeth lightly against the wood just beside your layout mark.
Do not press down heavily.
If your tenon saw is designed primarily for a push stroke, begin close to the handle end of the blade so you have room to make controlled forward movements.
Some backsaws have different tooth configurations, so use the cutting direction appropriate for your particular saw.
Step 6: Start With Short, Light Strokes
Starting the cut is often the most difficult part.
Use your thumb or another safe guiding technique near the side of the blade to help position it, keeping your fingers away from the cutting teeth and intended path.
Make two or three short, gentle strokes to create a small groove.
Once the teeth establish a kerf, the blade will naturally track more easily.
Do not try to begin with a long, powerful stroke. That often causes the teeth to jump away from the layout line.
Step 7: Extend the Stroke Gradually
Once the kerf is established, lengthen your sawing motion.
Use smooth strokes that engage a useful portion of the blade.
Keep your grip firm enough to control the saw but not so tight that your wrist and arm become tense.
The saw should move freely.
If you find yourself pushing hard to make progress, the blade may be dull, the teeth may not suit the cut, or your technique may be causing unnecessary binding.
Step 8: Watch More Than One Line
A common beginner mistake is concentrating only on the line visible on the top face.
The saw can follow that line perfectly while leaning to one side, creating a cut that is not square.
If you marked the line around two faces, alternate your attention between them.
Check the top layout line and then the vertical line on the side.
This helps keep the blade square in both directions.
Step 9: Let the Saw Do the Work
Do not force the blade downward.
Use moderate, controlled strokes and allow the teeth to remove material naturally.
Excessive pressure can make the blade wander, bind, or cut beyond your intended line.
The goal is not to finish as quickly as possible. With a tenon saw, control matters more than speed.
Step 10: Slow Down Near the End
As the cut approaches completion, reduce pressure and shorten your strokes.
If the unsupported waste piece breaks away suddenly, it can tear fibers from the finished side of the workpiece.
Support the waste portion with your free hand when appropriate, keeping your hand safely away from the blade.
Finish with light strokes until the cut separates cleanly.
Key Takeaways:
- Mark the cut clearly and always identify the waste side before sawing.
- Begin with short, light strokes so the blade establishes an accurate kerf.
- Watch both the face and edge lines to keep the cut straight and square.
- Reduce pressure near the end to prevent splintering.
How to Start a Tenon Saw Cut Without Slipping
A clean start is essential because the first few strokes determine the path the blade will follow.
Place the saw exactly where you want the kerf to begin and use almost no downward pressure.
The first movement should be controlled rather than powerful.
Some woodworkers lightly draw the saw backward once to establish a tiny notch before beginning normal cutting strokes. Whether that helps depends partly on tooth geometry and personal technique.
The important point is to create a shallow kerf before committing to full strokes.
Use a Knife Line for Fine Joinery
For especially accurate joinery, a marking knife provides a much better reference than a thick pencil line.
You can also create a small knife wall on the waste side of the layout line. A shallow chisel cut along this waste side creates a tiny ledge that helps guide the saw during the first strokes.
This technique is particularly useful when cutting tenon shoulders where a crisp, square shoulder matters.
How to Keep a Tenon Saw Cutting Straight
Even with a rigid backsaw, poor technique can make the cut wander.
The key is to guide the saw rather than constantly correcting it.
Keep Your Wrist Neutral
Your wrist should remain reasonably straight.
If you twist your hand inward or outward, the blade tends to follow the same direction.
Align your grip, wrist, elbow, and shoulder with the cutting path.
Do Not Grip the Handle Too Hard
A tight grip makes it easy to steer the blade unintentionally.
Hold the saw securely, but keep your hand relaxed enough to allow a natural stroke.
Think of guiding the saw along the line rather than forcing it through the wood.
Use the Blade’s Reflection as a Guide
On polished saw plates, the reflection of the workpiece can help show whether the blade is vertical.
When the blade is square to the wood, the reflected edge can appear visually continuous with the workpiece.
This takes practice, but it can be a useful additional reference.
Check the Cut Early
If you notice the blade beginning to wander, correct it while the kerf is still shallow.
Do not aggressively twist the saw once you are deep into the wood. That can make the cut rougher and may damage the blade.
Small corrections early are much easier than major corrections later.
How to Make a Square Crosscut With a Tenon Saw
A tenon saw is excellent for small, accurate crosscuts.
First, mark the line across the face with a square and continue it down the visible edge.
Clamp the workpiece securely.
Start on the waste side of the line using light strokes.
Once the kerf is established, lower the blade gradually so the teeth follow both the top and side layout lines.
Check periodically that the blade remains vertical.
When you are nearly through, support the offcut and finish with light strokes.
After cutting, place a square against the cut surface to check accuracy.
Minor irregularities can often be corrected with a sharp plane or sanding block, although it is better to develop a sawing technique that requires minimal correction.
How to Cut a Tenon With a Tenon Saw
The tenon saw gets its name from one of its primary jobs: producing the cuts needed for a mortise-and-tenon joint.
A tenon typically consists of a central projection that fits into a matching mortise.
Two types of cuts are especially important: shoulder cuts and cheek cuts.
Mark the Tenon Carefully
Accurate layout is essential.
Use a marking gauge to establish the cheek lines consistently and a square or marking knife to establish the shoulder.
Carry the shoulder line around all necessary faces so you can see whether the saw remains square.
Cut the Tenon Cheeks
Depending on the saw tooth geometry and your preferred method, begin with the cheek cuts.
Place the blade on the waste side of the gauge line.
Start carefully at the corner and establish a kerf.
Watch the lines on both the end grain and side of the workpiece.
Some woodworkers angle the cut slightly at first so they can see and establish two adjacent layout lines before leveling the saw.
Continue until you reach the shoulder line.
Do not cut beyond it.
Cut the Shoulders
The shoulder cut determines how cleanly the joint closes against the mating piece.
Use a knife line if possible.
Start on the waste side and saw carefully across the shoulder.
The goal is to stop precisely at the cheek without cutting excessively into the tenon.
If the joint requires small final adjustments, a sharp chisel or shoulder plane can refine the fit.
Test the Fit Rather Than Forcing the Joint
A tenon should fit the mortise appropriately for the joint and adhesive being used.
If it is slightly too tight, identify the exact area causing the problem and remove material carefully.
Do not hammer a badly oversized tenon into the mortise. You may split the surrounding wood.
Using a Bench Hook With a Tenon Saw
A bench hook is one of the best accessories for making controlled crosscuts with a backsaw.
It is a simple workholding aid that hooks against the edge of a workbench while supporting the workpiece against a fence.
Place the bench hook on your bench, press its lower cleat against the bench edge, and hold the workpiece firmly against the upper fence.
Position your cut slightly beyond the end or cutting area of the fence.
The bench hook keeps the wood stable and provides a convenient reference while your other hand operates the saw.
For small pieces, this is often faster than setting up clamps.
Why a Bench Hook Improves Accuracy
The workpiece cannot slide away easily, and the fence provides consistent support.
Some bench hooks also provide a sacrificial surface beneath the cut, helping reduce breakout and protecting the workbench.
For beginners learning to use a tenon saw, I strongly recommend practicing square crosscuts on a bench hook before attempting precision joinery.
Push Stroke vs. Pull Stroke: Which Does a Tenon Saw Use?
Traditional Western tenon saws usually cut primarily on the push stroke.
Japanese-style backsaws, by contrast, generally cut on the pull stroke.
Do not assume all saws with rigid backs operate identically.
Look at the tooth direction or consult the manufacturer’s guidance if you are unsure.
Using the saw in its intended cutting direction helps the teeth work efficiently and reduces unnecessary effort.
How Much Pressure Should You Use?
Very little downward force is necessary when the blade is sharp.
Your forward or pulling motion should move the teeth through the wood while gravity and light hand pressure maintain contact.
Excessive force can cause the saw to:
Bind in the kerf, wander from the line, vibrate, or leave a rougher surface.
If cutting feels unusually difficult, inspect the blade.
Resin buildup, damaged teeth, or a dull saw can make proper technique much harder.
What Wood Can You Cut With a Tenon Saw?
A tenon saw can cut both hardwood and softwood.
Common examples include pine, poplar, oak, maple, beech, walnut, and many other woodworking species.
Harder woods naturally require more effort and may cut more slowly.
The saw works particularly well on relatively small stock used for furniture and joinery.
Can You Cut Plywood With a Tenon Saw?
Yes, especially for small accurate cuts.
The fine teeth can leave a cleaner edge than a coarse general-purpose hand saw.
However, plywood can splinter along the veneer.
Use a sharp blade, mark carefully, support the sheet, and consider scoring the cut line with a knife when appearance matters.
For large sheet goods, another saw may be more practical because a tenon saw’s reinforced spine limits cutting depth and stroke.
Can You Cut MDF With a Tenon Saw?
Yes, although MDF produces fine dust and can dull cutting edges over time.
Support the material properly and use suitable respiratory protection when dust exposure is significant.
A tenon saw is more practical for small MDF components than for breaking down large panels.
Tenon Saw vs. Hand Saw for Cutting Wood
A tenon saw and general-purpose hand saw overlap somewhat, but they are optimized for different work.
| Feature | Tenon Saw | General Hand Saw |
| Best use | Accurate joinery and small cuts | General lumber cutting |
| Blade | Thin and reinforced | Longer and flexible |
| Tooth pattern | Usually finer | Often coarser |
| Cut quality | Cleaner | Generally rougher |
| Cutting depth | Limited by back | Much greater |
| Precision | Excellent | Moderate |
| Speed on large lumber | Slower | Faster |
For making furniture joints, trimming small stock, or producing controlled crosscuts, I would choose the tenon saw.
For cutting large boards quickly, a general-purpose hand saw is usually more suitable.
Key Takeaways:
- A tenon saw prioritizes precision and clean cuts rather than maximum cutting depth.
- It works on hardwood, softwood, plywood, and other wood products within practical thickness limits.
- For large construction lumber, a conventional hand saw is usually more efficient.
Common Mistakes When Cutting Wood With a Tenon Saw
Most poor cuts come from a few repeatable mistakes.
Cutting on the Wrong Side of the Line
Always identify the waste.
If the kerf removes material from your finished dimension, the part may end up permanently undersized.
For accurate joinery, preserve the layout line and refine the fit afterward if needed.
Starting With Too Much Force
Aggressive starting strokes cause the teeth to jump and damage the surface beside the cut.
Start gently and establish a kerf first.
Watching Only the Top Line
The blade may appear perfect from above while leaning badly to one side.
Mark and watch the adjacent face as well.
Forcing the Saw
A properly sharpened saw should cut without heavy downward pressure.
Forcing it makes precise control harder.
Cutting Past the Shoulder Line
When cutting a tenon cheek, stop exactly at the shoulder.
Overcutting weakens the joint and can leave visible gaps.
Holding the Workpiece by Hand
If the workpiece moves, accurate sawing becomes unnecessarily difficult.
Use a vise, clamp, or bench hook.
Trying to Correct a Deep Crooked Kerf
Once a deep kerf has wandered, forcing the blade sideways usually makes matters worse.
Concentrate on establishing the correct direction during the first portion of the cut.
How to Prevent Splintering
Splintering typically occurs where the blade exits the wood.
Several techniques can reduce it.
Use a sharp, fine-tooth saw and avoid excessive pressure.
Score important layout lines with a marking knife.
Support the waste piece near the end of the cut so it does not tear away under its own weight.
You can also place sacrificial wood behind certain workpieces when the setup allows it.
Most importantly, slow down as you approach the final fibers.
How to Know Whether Your Cut Is Accurate
After completing the cut, inspect it before moving on.
For a crosscut, use a try square against the freshly sawn face.
Look for gaps between the square and the wood.
For a tenon, inspect the cheeks and shoulders and test the joint gently.
A well-cut tenon should not rely on excessive force to fit.
Small inaccuracies are normal while learning. The purpose of practice is to reduce how much correction is required after sawing.
How to Practice Using a Tenon Saw
Do not make your first serious attempt on an expensive project.
Take a piece of scrap wood and draw several square lines around it.
Practice cutting on the waste side while preserving each pencil line.
Then check the cut with a square.
Next, mark several simple tenons and practice stopping precisely at the shoulder line.
This immediately reveals whether you tend to drift left, right, toward yourself, or away from yourself.
Once you recognize your natural error pattern, correcting it becomes much easier.
Tenon Saw Safety
A tenon saw is manually powered, but it can still cause serious cuts.
Secure the workpiece instead of trying to hold a small piece immediately beside the blade.
Keep your supporting hand away from the cutting path.
When using your thumb as an initial blade guide, keep it beside the smooth plate and safely away from the moving teeth.
Use eye protection when appropriate, particularly when cutting brittle material or working in an environment where chips may be produced.
Keep the blade clean and properly maintained. A dull saw encourages excessive force and reduces control.
Store the saw so the teeth are protected from damage and accidental contact.
How to Maintain a Tenon Saw for Better Cuts
Even excellent technique cannot fully compensate for a poorly maintained saw.
Wipe resin and dust from the blade after use.
Keep the tool dry to reduce corrosion.
Protect the teeth during storage.
Traditional sharpenable tenon saws may eventually need professional or knowledgeable hand sharpening and tooth setting. Some modern saws use hardened teeth that are intended to remain sharp for a long time but are not practical to resharpen with ordinary files.
If the saw suddenly requires significantly more pressure than before or refuses to track properly despite good technique, inspect the teeth for wear or damage.
FAQs about how to cut wood with a tenon saw
How do you cut wood with a tenon saw?
Mark the cut, secure the wood, place the blade on the waste side, start with short light strokes, and gradually extend the stroke while following the layout line.
Keep the blade square and let the teeth cut without excessive pressure.
Do you push or pull a tenon saw?
Traditional Western tenon saws generally cut on the push stroke.
Japanese backsaws typically cut on the pull stroke. Check the tooth orientation and instructions for your particular saw.
What is a tenon saw best used for?
A tenon saw is best for accurate joinery and relatively small woodworking cuts.
It is commonly used for tenons, lap joints, shoulders, and precise crosscuts.
Can you use a tenon saw for normal wood cutting?
Yes.
You can use it for ordinary small crosscuts where accuracy and a clean surface are more important than speed.
Its reinforced back makes it less suitable for very deep cuts.
How do I start a tenon saw cut?
Place the blade on the waste side of your mark and make a few short, gentle strokes.
Once a shallow kerf forms, gradually increase the stroke length.
Which side of the line should I cut on?
Cut on the waste side of the layout line.
The saw kerf removes material, so preserving the line helps maintain the intended finished dimension.
How do I keep a tenon saw straight?
Keep your wrist, elbow, and shoulder aligned with the cutting direction.
Use a relaxed grip, watch layout lines on two faces, and avoid forcing the saw.
How do I cut a straight 90-degree line with a tenon saw?
Mark the line with a square across the face and down the edge.
Follow both lines while cutting and periodically check blade alignment.
A bench hook can make small square crosscuts easier.
Can I use a tenon saw with a bench hook?
Yes.
A bench hook is an excellent companion for a tenon saw because it holds small pieces securely and makes accurate crosscuts easier.
How fine are the teeth on a tenon saw?
Tooth count varies by manufacturer and intended use.
Tenon saws generally have finer teeth than rough general-purpose hand saws because they are designed for cleaner, more controlled cuts.
Can a tenon saw cut hardwood?
Yes.
A sharp tenon saw can cut hardwood effectively, although dense species usually require more time and controlled strokes than softwood.
Can a tenon saw cut plywood?
Yes, particularly for smaller accurate cuts.
Use a sharp blade and support the plywood well to reduce veneer splintering.
Can a tenon saw cut MDF?
Yes.
It can make controlled cuts in MDF, although the material produces fine dust and may wear cutting edges over time.
Can a tenon saw cut a 2×4?
It may be able to make some cuts in a 2×4 depending on blade depth and saw design, but the rigid spine limits maximum cutting depth.
For routine construction-lumber cutting, a general hand saw is usually more practical.
Why is my tenon saw getting stuck?
Binding can result from a crooked kerf, excessive pressure, damaged or incorrectly set teeth, resin buildup, or movement in the workpiece.
Stop and inspect the cut rather than forcing the blade.
Why does my tenon saw cut crooked?
Common causes include twisting your wrist, using too much force, watching only one layout line, starting the kerf inaccurately, or using a dull saw.
Practice with scrap wood and focus on body alignment.
Should I cut directly on the pencil line?
For precise joinery, it is usually safer to cut just on the waste side while preserving the layout line.
You can remove a very small amount afterward if necessary, but you cannot replace material accidentally sawn away.
How do I stop wood from splintering?
Use a sharp fine-tooth saw, score the cut line when appropriate, support the waste piece, and use lighter strokes as the blade exits the wood.
Is a tenon saw the same as a backsaw?
A tenon saw is a type of backsaw.
“Backsaw” is the broader category for saws with a reinforced spine, while a tenon saw is designed specifically for larger or deeper precision joinery cuts than some smaller backsaws.
Is a tenon saw good for beginners?
Yes.
Its stiff blade makes it relatively easy to guide accurately, although beginners still need practice starting the kerf and maintaining a square cut.
Do I need to clamp the wood when using a tenon saw?
You should secure the workpiece using a vise, clamp, or bench hook whenever practical.
Stable work makes accurate sawing safer and easier.
Conclusion
If you want to learn how to cut wood with a tenon saw, concentrate on accuracy rather than force. Mark the workpiece carefully, determine the waste side, secure the wood firmly, and establish the cut with a few light strokes before using longer movements.
The reinforced back of a tenon saw helps keep its blade rigid, making it particularly well suited to clean crosscuts and accurate woodworking joints. However, the tool can only follow the path you establish. A poor starting kerf or twisted wrist can still send the blade away from the line.
For general cuts, mark the face and edge with a square and watch both lines as you work. For tenons, take even greater care with the shoulder and cheek layout because small errors directly affect how the joint fits.
I recommend beginners practice first on scrap wood. Make several square crosscuts, check them with a try square, and learn how your grip and body position affect the blade. Then practice simple tenons before moving to a finished project.
Most importantly, let the saw do the cutting. A tenon saw works best with a relaxed grip, light pressure, and smooth, controlled strokes. Start accurately, stay on the waste side of the line, slow down as the cut finishes, and you can produce clean, square cuts without needing a power saw.